Two fat quarters
Thread
Wadding
Ribbon (or a button and elastic)
1) Start by folding one fat quarter in half (whichever one you want to be the main part of the case)
Cut one quarter of the length off. What is left will form the case. With a second fat quarter, cut two pockets. The first is half the height and half the width of a fat quarter. this is then folded in half as shown below (the left hand piece of checked fabric). The second is just a small rectangle again, folded in half (the right hand piece of checked fabric below).
*Please note this is not the final position for the small square it was just placed there to show size
2) Fold the large pocket in half (right sides facing) and sew along one short edge.
3) Check that the height of the small pocket is right for your darning needles. You want enough needle sticking out at the top to grab them when they're in the pockets (See left photo). If the pocket is too deep take a little off the height at this point before sewing. Then fold the small one in half (right sides facing) and sew around the 3 open edges leaving a gap to turn inside out (the gap is more visible in the photo on the right as I used more of a contrasting thread)
5) Again, check the height is right for your crochet needles. If it's too tall just lower the pocket down the base fabric and leave some hanging off the bottom. you can trim this later once you've sewn along the bottom.
6) While your crochet hook is in place (as above) fold the top of the case over so that it encloses the top of the hook. This will prevent the hooks sliding out once complete. It may help to run the iron over the fold at this point so that you can see where it will be once you've removed the needle again.
7) Next place the small pocket towards the right of the base. With a darning needle in position, ensure that the top of the needle sits just below the fold you made before. If the pocket is too low down, the needles will slip out. Once this cushion is in the correct position, pin it to the main fabric (making sure you only pin it to the top layer not right through both).
9) Then using the thickness of your hooks as a guide, sew lines down the large pouch at varying intervals to create the individual hook pouches. Then do the same with the small pocket using your darning needles as a guide. I've used the photo of a finished case below (which is a different case) just because you can see more clearly how I did these lines thanks to the contrasting thread!
10) Cut a piece of wadding to the same size as your base fabric (once it's folded in half).
11) Loosely roll your main fabric and measure a piece of ribbon long enough to go around your rolled up hook case.
12) Fold your fat quarter in half so that the right sides are together (the pockets are on the inside with the small one to the right) Place the ribbon inside, folded in half with the fold lined up with the right-hand edge of the fabric. Where the fold is, pin the ribbon to the edge where my finger is pointing. You may want to tack this on by hand to make it easier when machine sewing the edge.
13) Keeping this orientation, lift the fabric and lay it onto the wadding that you cut before. Pin it and sew around the three open edges being careful to sew over the folded edge of the ribbon but not over any of the rest of the ribbon inside. Make sure you leave a gap to turn it the right way around. Trim off any excess wadding and fabric around the edges and trim the corners.
14) Here's the gap! (see my fingers?) Turn everything the right way round, making sure you pull all the ribbon through. Then sew up the gap by hand. Fold the top down over where the needles would sit as before and iron it down again to give a need finish. Ta Dah!
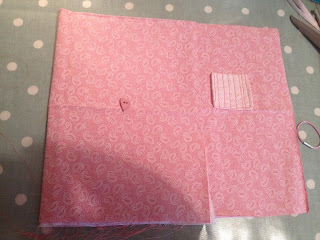
Most of the method is the same but just after step 7 (before you open up the base fabric to sew on the pockets) you will need to fold the left side of the case over about 3/4 of the way (as below) and sew a button on half way down the back in the centre of this folded section. The 1/4 on the right will later have the loop attached and will fold inwards to meet the button.
When you come to step 12 where you turn the piece inside out to put the ribbon on, instead place a piece of elastic (or a little hairband as I did!) tied in a loop so that the tied end is at the right hand side and the loop is in between the two sides of fabric. (In the photo I am showing the orientation but I will then slide the loop inside the fabric so it is sandwiched between the two sides. When I turn it the right side out the loop with then be on the outside. Also ignore the fact I've already sewn my edge!)
Ta dah!

I then filled mine with a basic set of hooks, a stitch diagram booklet and a crochet magazine...
...et voila! A lovely little gift for a crochet beginner!
Thank you and hope you pop by again soon!
Elizabeth


No comments :
Post a Comment