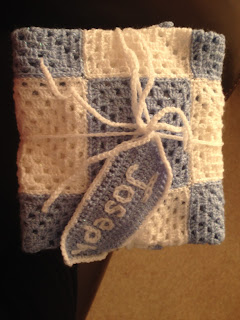
Those of you who know me will know how much I LOVE to crochet! I will sit and crochet most evenings while the TV is on in the background, I crochet in the car on long (or sometimes even short) journeys and I will even crochet while sitting in the garden sunbathing (on the rare occasion we get some sun here in England!).
My mum taught me to crochet when I was quite little, just starting me off with making a simple chain but I didn't really progress from there at the time. Once I had my first child I was keen for him to have a special home-made stocking, like the ones my mum had crocheted for me and my sister when we were little, so I asked her to teach me. These were a great way to start as they are made up of Granny Squares which are super-easy to learn and work up quite quickly so it's not long before you are getting results which I find really helps me keep going when I am learning a new skill. One of the reasons I'm not so keen on knitting is that you feel you're working really hard but can't really see any results for ages!
Since making the stockings I have made a few blankets from Granny squares which is so simple as you just join them all together with a darning needle and yarn. I then do a little border either in Double crochet stitches or Trebles.
Here are the bits I've made! Hope you enjoy them. I personally love looking at crocheted bits. They are sooo yummy!
This is a stocking that I made for my friends daughter (after making mine I seemed to get lots of commissions for these from friends!) The ones my children have are bigger as I made them 4 squares tall (I can't find a photo of them at the moment. I'll take some more this year!)
These are the squares I did to make my own blanket. I used 5 different colours and alternated them to make different squares. I always finished with round 6 in cream (so never used cream on round 5) this meant the blanket would look like it had a cream background. I joined the squares in cream and also used it for the start of the border.
Here it is all finished! So cosy!!
First I tried a scalloped edge...
...but I decided I preferred the shell edge.
I also used Granny Squares to make a blanket for my friend's baby which is so cute!
By this point I was a Granny Square Pro! I decided to give other patterns a go and I am now well and truly hooked (get it?!?!)
I will blog another day about other bits I have done with links to the patterns.
I hope you have all enjoyed all this crochet yumminess! I've got a granny square pattern below for those who want it. Please comment with any suggestions for blogs or anything you would like me to do if you have ideas. Thanks!
Bye for now!
Elizabeth x
The pattern I use for my Granny Squares (for those who crochet) is as follows:
Round 1
-Ch 5 sl st into 1st ch
-ch 3 (counts as first tr)2tr, ch1 3tr, ch1 3tr, ch1 3tr, ch1 sl st into top of ch3.
change colours
Round 2
Starting in a ch space ch3 (counts as 1st tr) 2tr ch 1 3tr ch1, *Then into next chain space 3tr ch1, 3tr ch1
repeat from * twice more then sl st into top of ch 3
Round 3
Starting in a ch sp between the two clusters of trebles from before ch3 (counts as 1st tr)2tr ch 1 3tr ch1,
*Then into next ch sp (the larger space with the cluster from the previous row below it) - 3tr 1ch,
Then into next ch sp (Between two clusters again) 3tr ch1, 3tr ch1,
Repeat from * twice more
Then into next ch sp (the larger space with the cluster from the previous row below it) - 3tr 1ch,
Then sl stitch into top of ch3
Round 4
Continue to work as before making clusters of 3tr in each ch space and 2 clusters of trebles into the spaces between the previous 2 clusters of trebles (these form the corners to the squares)
Round 5
Continue as in round 4
So these are the squares all sewn together ready to make my stockings. Then I just crocheted a long strip of Treble crochets long enough to go down one side along the bottom, round the toe and up the other side to join the two together.

Please let me know if you find any errors in the pattern! Thanks x


No comments :
Post a Comment