Monday, 17 April 2017

How To Give Medicine To A Rabbit | Weekly Vlog

New Weekly Vlog 


This week we have been on Easter Holidays. I had to work for two days but I was lucky enough to have the rest of the week off. We have enjoyed doing some Easter crafts, had a trip to Soft Play and to the Cinema as well as some quality time together at home!


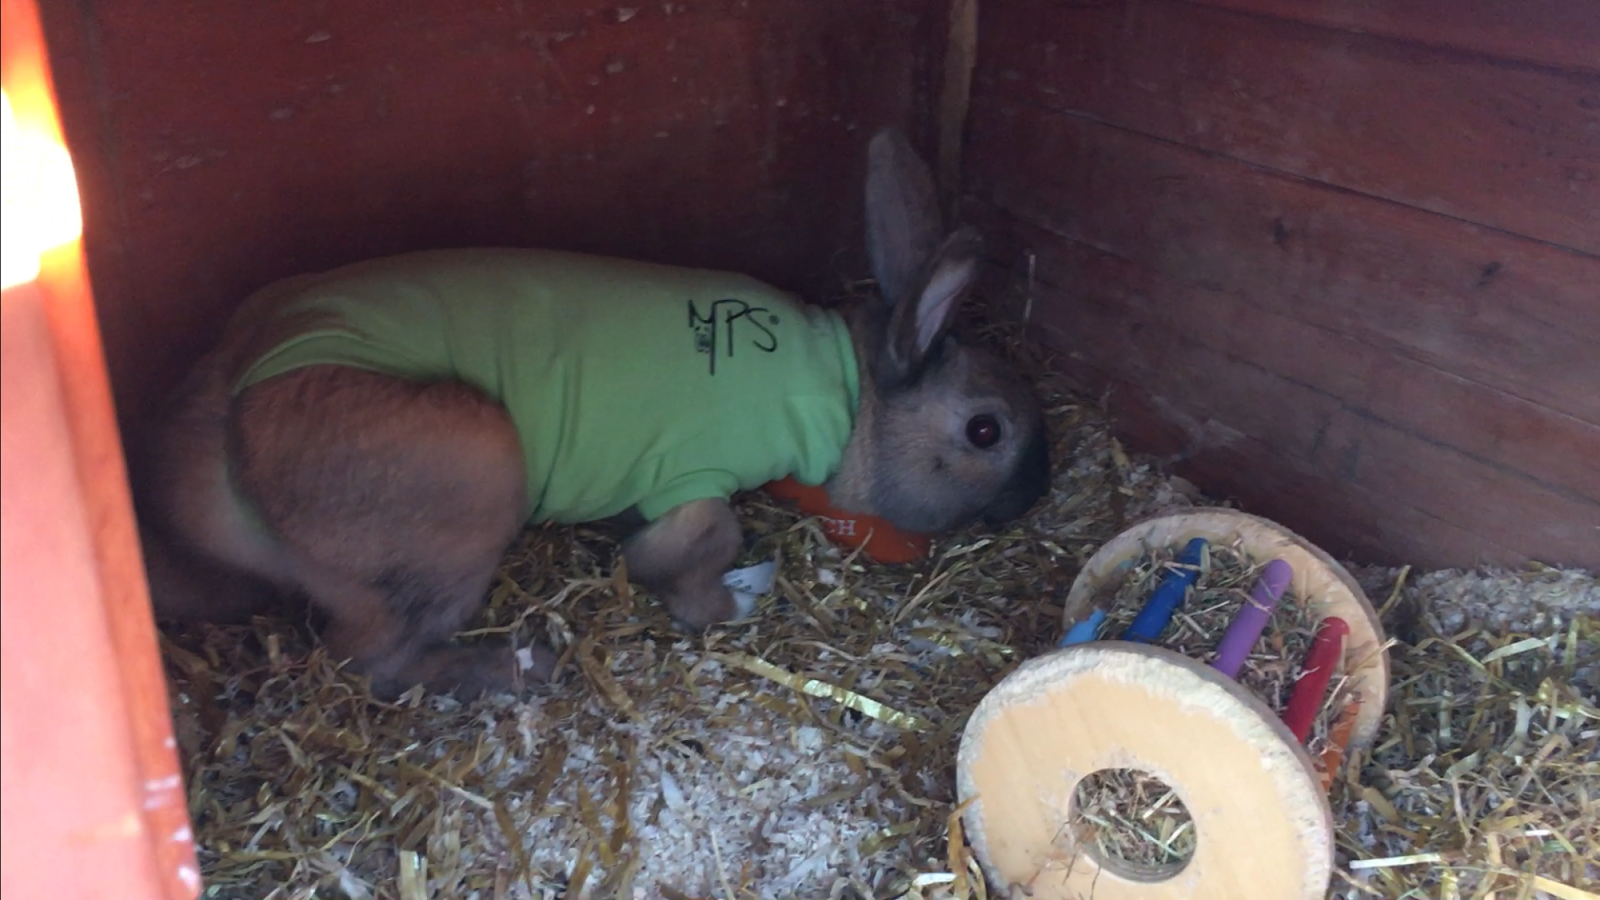
Last week our two male rabbits went to the Vet to be castrated and we have had to keep a close eye on their recovery. This week we took them back for a check up and Fluffy wasn't doing so well. The vet thinks he might have been nibbling at the wounds or that his hutch is too big and he was able to run around too much so we had to make a temporary barrier in the hutch to minimise the space each rabbit had. The vet also put him in a little onesie which I thought made him look like a character from a Beatrix Potter book! He was also prescribed some medicine which had to be fed on a syringe twice a day which was a bit of a challenge to start with.

A Rabbit in a Onesie!

Of the two rabbits, Fluffy was the more timid. He would run away whenever we came near and even trying to catch him in his hutch had always been a challenge! However as he had limited space now and was initially still a bit sedated, it was a bit easier to catch him. The vetenary nurse had shown me the best way to hold him to help keep him still and how to lift his top jaw to get the syringe into the side of his mouth in the gap behind his front teeth. At fist I struggled a bit to find his mouth as he is so fluffy (hence the name!) that it was hard to see where his top jaw ended and the bottom one began! Once I had managed to get the syringe in though, the rest was easy as he instinctively started to lap up the liquid.


I think that in a way, having to give him this extra support has helped to make him more tame as he is now getting used to being handled. The vet has now given him the all-clear and the onesie is off and the medicine is all finished so I really want to make sure that we are still trying to handle him daily so he doesn't go back to being timid with us!


Anyway, That's us for this week, I hope you enjoy the weekly vlog. Check our our new Beauty and the Beast rating in the Vlog as that was what we went to see at the cinema! We will be back with another one next week which will be more Easter Holiday Adventures!


Hope you are all having a lovely time over the holidays


Elizabeth  x


Tuesday, 11 April 2017

Simple Easter Card Idea for Kids


Today we needed to make our Easter cards for the parents as it's the children's last day with me before the Easter Weekend. I look after two children who are only two years old and as we were a bit pushed for time I decided that all the children could make the same style card rather than organising something more challenging for the older ones. I decided to go with Potato printing as it's simple enough for the little ones but it's also something that the older ones still enjoy. It was so simple but effective.

Here's what you will need:
2 Large potatoes
poster paints in Spring colours
Card (we used A3 to fit more prints on)


I just sliced the potatoes lengthways and then carved designs onto the cut side.


I cut two wedges out of the back of the potatoes.  This just helps to give the children a bit of a grip on the potatoes as they can be a bit hard to pick up otherwise.


Then I let the children get to work stamping. They all really enjoyed choosing colours to use and working out where to place them. We got a good chance to talk about the special people in our lives too as the children decided who they were going to give their cards to. Everybody wanted to make more than one! It was a good opportunity for learning colour names too as well as a chance to talk about Easter traditions so it fit into many areas of the EYFS!


Once Olivia had finished her prints she decided to dip her fingers into the paint to add decorations to her eggs. It's amazing how children think up these lovely ideas. That wasn't something I had planned on doing but it just came organically to her! Once she had decorated all her eggs she then used the different colours to add polka dots all around the spaces on her card!


We have left them to dry in the sun for now but before dinner we will be writing in them, giving us a chance to explore mark-making with the little ones and practise name writing with the pre-schooler. My two older ones can write now but it's a good chance to go over the way we lay out the writing in cards and letters. 

Happy Easter Everyone! 

Elizabeth


Sunday, 26 March 2017

Making Playdough

                        We made purple sparkly playdough!                                                              

This weekend Olivia got out our box of playdough tools to play with then realised that we had no playdough! She asked me if we could make some and I suggested that as we made it, she could film herself showing how to make it. She has been a bit shy about being on the camera until now and has sometimes asked not to be filmed but on this occasion she jumped at the chance. She did a really good job of 'presenting' too and enjoyed telling everybody what they needed to do to make the playdough! 

We used our go-to playdough recipe which does involve cooking but it really isn't a hassle or complicated or anything. We LOVE this recipe as the playdough comes out really soft and squishy and lasts for ages!

Here's what you will need:


2 cups of plain flour
2 cups of water
1 cup of flour
2 tablespoons of oil
2 heaped teaspoons of cream of tartar
Food colouring (I usually buy this on eBay)

Optional: You can also add different flavourings to give a nice scent. On the right of the picture above you can see the little bottles I used (the two in the picture are bubblegum and strawberry and they smell AMAZING!! These are also from eBay) Sometimes we have even used things we find in the garden like rosemary, lavender or mint. 
This photo is from about a year ago but it shows the children adding some rosemary to the dough.


We also added in some purple glitter to our dough. My children are both old enough not to be putting playdough in their mouths anymore but if you have children who are still doing this then you can buy edible glitter so that you know it is safe!

Method:

All you do is tip everything into a saucepan and stir together until there are no lumps. This part is so much fun for little ones to join in with as they love to fill the cup up with the ingredients and tip them in and stirring is always a hit! 

The next part is definitely a job for an adult, put the pan over a medium to high heat and keep stirring! The mixture does stick easily so don't get distracted! It will get to a point where it gets really hard to stir as it all clumps together but keep at it as it won't be cooked through yet. Keep scooping it and turning it then kind of squashing it down to spread it across the base of the pan to cook. 

You will know when it is ready as you will notice the colour starting to darken and it will have formed a ball as you stir. Just tip it out onto a board and after letting it cool for a few minutes, knead it well. Then let the fun begin! 

I hope you enjoyed this blog, if you would like to watch how we made it (presented by the super-cute Olivia!) then please check out our Youtube channel 'House of Sparkle' or the link to the actual video is here: https://youtu.be/bNB0V1utZig Please give it a thumbs up and Subscribe to our channel to keep up with everything that we are getting up to!

Thanks and see you soon!

Elizabeth x

Monday, 20 March 2017

New Video up!

Hi Guys!


I have made my first video tutorial! We have recently started making Youtube videos but so far we have done Family Vlogs so this is the first time I have tried a Tutorial and been in front of the camera like this. Because we are new to Youtube I had to use one of their generated thumbnails so it's not the greatest but I have since spent some time sorting that out and the next Vlog will have a customised one. However, I am still getting to grips with THAT technology too so bear with me!


I really hope you all enjoy the video, if you do please hit the like button. Also, if you would like to see more please subscribe to keep up with all the goings on at the House of Sparkle!


Elizabeth x

Tuesday, 14 March 2017

Diet Fail!


Our next Vlog is up! Joshua wanted to Vlog a school day which is tricky as I usually have childminded children who I obviously can't film etc so we had to work around that a bit! Olivia was really tired after school and did not want to go to rainbows. I let her stay home and she did get a high temperature in the night but she was ok in the morning and really wanted to go to school  for Golden Time. However, by 11 am I got a call from the school as her temperature had spiked and she felt really sick. I took a urine sample to the GP and she had an infection! She got a course of antibiotics and was feeling better by the next day.


See you again soon


Elizabeth

Friday, 10 March 2017

Our First Family Vlog - The Millet Family

We made a Youtube Video!!


For a while now Joshua, my 8 year old, has been getting into watching vloggers on Youtube (with supervision of course). He especially enjoys watching family vloggers The Sacco-Jolys and how they record their daily lives and the whole family gets involved. Lately I have noticed him using my old iphone to film himself just chatting away about his life!

Then, the other day, he told me he wanted to become a Youtuber for his job! He was asking me if children could be Youtubers and how old you had to be to have a Youtube channel. I told him that, although he was too young to have his own Youtube account, if he really wanted to make videos I could help him and upload them for him. After a lot of chat about it he decided it should be a family vlog that we could all be part of. I must also add that I have been thinking about making videos for some time as it's such an amazing way of documenting all the special moments in our lives that we can look back on and also, as parenting is such a minefield I thought it may help people to hear tips and tricks we have picked up along the way. I am by no means saying that I know it all but as I have worked with children all my life I've dealt with many things!

He really had fun making the clips but I have to say I found I was a bit self-conscious in front of the camera! At the end of the day I had the task of trying to put all our clips into a video. Now, I am really not technical at all. I have a website for my childminding service as well as this Blog but both are really quite simple to use. They have a standard template and it's easy to figure out what to do but I can't make them fancy or add anything extra. As we had recorded clips on two different iphones I figured it would be easiest to transfer both sets of clips to my HP laptop. On it I have Windows Movie Maker and it was fairly straightforward to put the clips onto it and with a little trial and error I figured out how to roughly edit it and add a little text. Although it was fairly easy it took AGES!!

Once it was done I was really in two minds as to whether to upload it to Youtube. It felt like a huge responsibility putting my children and our lives out there for the world to see! There are a lot of lovely people and communities on Youtube but there are also a lot of trolls and I wasn't sure I would be able to handle that. However, Joshua was so determined to have his video on Youtube that I decided to go ahead and hit that Upload button! Who knew that a 7 minute clip would take 3 hours to upload?!?!? Maybe it's time to upgrade to Super-fast Fibre-Optic Broadband!

We really hope you enjoy our first ever Vlog. Please excuse the poor quality - we are learning! There may or may not be more depending on how it is received and how much time we have.

Elizabeth x 

Thursday, 9 March 2017

We've had the Chicken Pox!


It finally happened! I don't know how my children managed to avoid it for so long(they are 6 and 8) but at long last they caught Chicken Pox! Research says that 90% of children will have contracted chickenpox by the age of 4 and as a childminder I was sure my two would be in that 90%. We have always been around lots of other children at playgroups and then when they started school they both had cases of it in their classes each year but somehow they avoided it! However, when my eldest niece came down with it I figured our chances of contracting it were really high as they had spent so much time in close-proximity to her when she was at her most contagious and, low an behold, they got it!

So I thought I would just do a little blog post with some tips to help children (and their parents!) through this itchy time!

Recognising the symptoms

At first this can be a little tricky as it can start with just one or two red spots that look like any other spots but after a while you will notice more and more pop up and they will start to look like fluid-filled blisters. With Joshua he just had one for a day and we really weren't sure if it was going to become chicken pox but the next day he had about 8 and over the next few days literally hundreds popped up! Olivia's started in much the same way but she didn't get as many spots, probably about 80.

The incubation period for chicken pox (which is the time between catching the virus from somebody to the symptoms appearing) is around 10-20 days. People often mistake the incubation period for the contagious period but Chicken Pox is actually only infectious for around 2 days before the the first spots appear up until the last spot has formed a crust.


When to get help


As a general rule you don't need to take your child to the GP when they get chicken pox unless you are unsure whether it actually is chicken pox and want a diagnosis. The only other times you should see the GP with chicken pox are if a very young baby contracts Chicken Pox (under about 4 weeks old), if an adult contracts Chicken Pox or if the infected person develops complications (I will talk a bit more about this later) or has an illness which weakens their immune system.

People with Chicken pox need to be quarantined as, although it is usually a fairly straightforward illness, it can be dangerous to certain groups of people such as those with weak immune systems (eg people with HIV or those on chemotharapy) and pregnant mums who are not immune. There are a couple of pregnant mummies here (NOT me!) that I childmind for so I made sure I told them as soon as I knew that my children were infected and they were able to contact their GPs straight away and get their blood tested for immunity. Fortunately they were both immune...Phew!

Generally children recover well and there are no complications but, as with many simple illnesses, there  can be exceptions to this. Some of the rare complications include infections, Sepsis, and Pneumonia. If you notice any of the following you should seek medical attention: 
  • any difficulty breathing
  • very high fever (it's not uncommon for it to go to around 38.4 but if it goes into the high 38s I'd start to be concerned)
  • nausea and vomiting
  • sensitivity to light
  • stiff neck
  • confusion
  • severe headache
  • drowsy and hard to wake
  • has fits (seizures)
  • Dehydration from not being able to drink either due to blisters or lethargy
  • blisters which look very inflamed and infected
  • If the symptoms have not improved after 6 days
A spotty Olivia snuggled on the sofa

Treatment


When I was little, calamine lotion was always the parents' go-to product to help relieve the itching. These days it is not recommended because it is very drying which can lead to more itching and more chance of scarring and infection. Keeping nails short can help to prevent doing any damage if you are having trouble stopping little ones from scratching.

I found that just using Piriton antihistamine seemed to stop my children from feeling itchy at all. In the first few days I also used a product called Poxclin which comes in a bottle with a pump and comes out foamy. You spread it over the skin as often as needed. My children said it feels cool and a bit like sun-tan lotion. There are also other types of lotion available such as Virasoothe, E45 Itch relief cream and Eurax. Also, try to keep the body cool as being warm and clammy is said to worsen the itching.

Unfortunately, both my children were fairly unwell with it. They both had fevers and were quite lethargic for a couple of days. I treated the fever with Calpol (you can use any paracetamol that is suitable for children) DO NOT give Ibuprofen for the fever with chicken pox. The NHS website recommends not to use it "This is due to a very small risk of non-steroidal anti-inflammatory drugs (NSAIDs), such as ibuprofen, causing adverse skin reactions during chickenpox." this can lead to blisters forming deeper in the skin and possibly becoming infected.

Don't forget the healing power of cuddles too!

Sadly Olivia had lots of spots on her bottom and when she did a wee it would really sting! To help with this I would pour warm water over the area as she did her wee. Afterwards we would gently clean her with warm water, pat it dry, then apply Sudocream as a barrier to help protect the spots from the urine the next time she went.

The other thing to be careful about is keeping hydrated. This was tricky with my two as they both had blisters in their mouths and throats so they didn't want to eat or drink much as it hurt. I tried to entice them with drinks I knew they liked such as squash and milkshakes and they both would drink water if it was ' ice-cold'! In terms of eating I was really relaxed and just let them have whatever they fancied whenever they wanted as I felt it was more important that they got something in them rather than worrying about if they were eating healthily. A good tip is to get some ice pops (or make some from fruit juice/squash if you're house-bound) as they will numb the sore throats and hydrate at the same time. Also try offering soft foods such as soups as these are less likely to hurt any spots in the mouth.

Another thing people swear by is Oat baths. You just cut the foot out of a pair of tights and fill it with oats then hold it under the tap as you run the bath. The oaty water is supposed to be soothing. We have Aveeno for Olivia's dry skin anyway and this contains Oatmeal so it seemed to work in much the same way.

Once the fever had past they were bouncing around
 with as much energy as ever - just spottier!

I hope this was helpful to you guys and that if you or your child get chicken pox there is something here that will make things easier for you!

Elizabeth x
Thursday, 7 April 2016

Cutting creations!


It's the Easter holidays and it's raining, again! I needed something to entertain all the children from 3 years old to 7 (the baby was having his morning nap) I thought it would be interesting to see what my new little girl's cutting skills were like so I printed out some cutting worksheets from Sparklebox. But I thought the activity needed more of a purpose than just cutting for the sake of cutting so I thought we could use the strips we had cut to make creatures from our imagination.

We got out our scissor selection and our big pot of felt tips and got to work cutting along the lines. I gave the 3 year old the slightly easier lines with the least sharp angles and the older children had the trickier ones. We cut along the lines so that we ended up with thin, wavy, zig-zagy or straight strips. Then I asked the children to look at their strips and try to imagine what kind of creature or person they could be. The 3 year old found this tricky and ended up making patterns on her strips:


My 5 year old daughter was keen to think of creatures and she came up with a lady, a worm and a snake:


Joshua (aged 7) also made a snake. Then he decided he wanted a Star Wars theme for the rest. He thought of making Anakin Skywalker but realised it was quite tricky so he thought he would make Anakin's light sabre instead. When he had finished I picked it up and started swinging it around making light sabre noises and he realised he needed more than one. He decided he would make a light sabre in each colour so we could use them to have a battle!


It was also a good opportunity to practise name writing as the children needed an envelope each to put their bits into. My two can both write their names now but it was a good chance for Joshua to practise joining up. The 3 year old I childmind needs lots of opportunities to practise this new skill as she is not yet able to copy her name so I wrote her it in pencil on the envelope and let her pick a coloured pen to trace over the letters.


This activity kept the children busy for about 40 minutes and they all really enjoyed using their imaginations to come up with ideas while still developing their cutting skills, pencil control, colour recognition and language skills.

Friday, 1 April 2016

Making Easter Nests


Since Easter came right at the end of the school term I decided to hold off making the traditional Easter nests until now so that my two could join in the fun in the school holidays! They are always a firm favourite and since they don't really require any cooking (unless you count melting chocolate as cooking?) they are really easy to do with the littlies!

So here's how we did it:

You will need:
200g bar of chocolate (whatever kind you like really but we went for milk chocolate
Rice Krispies (you can use Shredded Wheat if you prefer that genuine nest effect but I find the children aren't really keen plus then you have a whole box left that nobody wants to eat!)
1 medium sized bag of mini eggs
Cupcake cases
Fluffy yellow chicks - these are available in craft stores and some supermarkets
A heatproof bowl
A saucepan of simmering water
A spatula or wooden spoon
Children - optional!
(With 200g of chocolate we got 22 cakes)


1. Have the children brake the chocolate into chunks and place them into a heat proof bowl. (Here's Joshua forgetting they needed to go into the bowl. He seems to be looking longingly at them!)


2. Place the bowl over a saucepan of simmering water (HINT: do not let the water touch the bowl or it won't work!) Stir the lumps around occasionally until they've completely melted.


3. Pour in some Rice Krispies. I didn't measure out a particular quantity. I just added some at a time and if they were very heavily coated in chocolate I would add some more until it looked like they were all coated nicely. The children loved stirring them in and this was a good opportunity to talk about taking turns!


4. With teaspoons, let the children fill their cake cases with the mixture then press the centres down with their thumb to make a little well.


5. Then let them place one little chick and 2-3 mini eggs (depending on how many you have!)


6. We then let them set in the fridge and ate some after our lunch. Here's a little box I put together for my childminded children to take some of theirs home as we had so many!

Enjoy!!!


Thursday, 31 March 2016

Back to childminding!


Happy House Childminding
Back in Business

Sorry it has been so long since I have posted but I have been very busy and had lots of changes since the new year. I have tried so many times to write this post but it just kept turning into an autobiography! Basically I just wanted to talk about the fact that I have recently started childminding again after dipping my toes back into teaching for a short time. I was a teacher before I had children, then, when my son was born, I couldn't bear to go back to work so I decided childminding was a good option as it meant I could stay at home and raise my family while still keeping up my skills and earning a wage. I think I always had it in the back of my mind that I would return to teaching one day when my children were older and didn't need me as much

When we moved to Basingstoke in May 2014 I didn't set up as a childminder again as I wanted to help my children settle into the new area and new schools. My daughter was due to start school that September and I realised that that meant I had no more babies at home all day and so maybe it was time to go back to school. To cut a long story short, I started working as a Teaching Assistant doing supply work in my children's school but they didn't have any permanent positions and it got to the point where I needed to earn a more regular wage. I decided to start childminding again about a year ago but then the school offered me more regular work as a Teacher covering maternity leave. However, as much as I loved the school, the children and the wonderful staff, I soon remembered all the down sides to teaching. The stress, the pressure, the long hours, the impact on family-life. I saw the effect it had on the other teachers, especially those with young families. I also realised that my heart was still in childminding. So I started to advertise as a childminder again.


I am really excited about this new beginning. This is the first time I have childminded from our new house and I have much more room here than in the old house. We have a dedicated playroom now (see the blog!) the garden is a bit bigger (although it really needs an overhaul!) and there are so many more green spaces here many of which are even in walking distance. I love the freedom that childminding offers, we can just choose what we want to do according to the weather and the interests of the children. I also love the fact that I can still take my children to school and collect them again. Also I'm able to be with them through the holidays and the fact that I'm childminding means I am more likely to do more exciting things with them whereas when I wasn't working we probably had an awful lot more PJ days than we should have!


So hopefully now, as well as my previous crafty and mummy blogs, there will now be some childminding adventure blogs on here; different activities we have done, places we have been and that kind of thing. So if that floats your boat keep checking back!

Thanks

Elizabeth x

Tuesday, 12 January 2016

Happy New Year! 2016 Resolutions


For me, the New Year starts the weekend AFTER we have all gone back to school or work. I really don't feel like I can make a fresh start while the Christmas decorations are still up, there are chocolates and naughty treats all around me and we are all on holiday mode or just making that transition back into getting up in the dark! Once we've got back into the old routine again I feel a bit more normal and then I can think about what I am doing with my life!

Now, normally I am not one for making new year's resolutions as I would always abandon them a month or so into the year. It seemed pointless making them knowing I wouldn't see them through so I gave up trying years ago!

This year however, I decided it was time to change that. My lack of resolutions in the past has meant that it was all too easy to just slip into old bad habits time after time, I had nothing to aim for or strive towards. I now realise that to make any improvements in my life I need to make a conscious decision to change things! The difference is that I now know I need to set realistic goals rather than the dramatic resolutions that I would make in the past. Resolutions like 'I am going to lose 3 stone this year' are going to put so much pressure on me that I'm just setting myself up to fail! A much better resolution would have been 'I will make more healthy food choices'.

I have been gaining weigh steadily since having my two children. At first I would just tell myself 'it's ok, it's just because I've had two babies, I will get my figure back soon! However, those babies are now 7 and 5 and not only have I not lost the weight, I've actually gained more!

I am not going to make the same mistakes as previous years by setting my goals too high. I just need to make more sensible choices. So with that in mind here are my 2016 resolutions.

1- Try to drink 6 -8 glasses of water a day
2 - Eat less refined sugar: biscuits, cake, chocolate etc.
3- Eat 5 a day (choose fruit snacks where I would have chosen sugary ones)
4- Exercise at least 3 times a week (housework counts!)
5 - Read more

Not groundbreaking I know but they are all little step towards forming better habits. I know number 5 has nothing to do with weight loss but I feel that reading helps to relax me and will contribute to making me a happier, healthier person!

So did you make any New Year's resolutions? If not it's never too late! You can decide to make improvements in your life at anytime but do write them down and look at them regularly to help you keep on track. Just make sure that if you do make any, you ensure that they are achievable goals.
Set yourself up for success!

Happy 2016 to you all x


Saturday, 14 November 2015

Frozen Fever


If, like me, you have a Disney's 'Frozen' Fan in your home, why not throw them a 'Frozen' themed birthday party? My Daughter wanted one for her 4th birthday party last year. Unfortunately her birthday is in July so we melted a little! Here are a few tips to make your Frozen Party sparkle!


Decorations


-Plan ahead! If (like us) you have a child whose birthday falls outside of the winter months, try to stock up in advance. Now is the perfect time to start planning because at Christmas time the pound shops have loads of great snowy decorations which are just the ticket for decorating your 'Frozen' party room. This frosty wreath would look great on the front door to welcome guests and the icicles look effective around the edges of tables. The paper snowflakes are great to hang around the room and are 3 for £1 (all from Poundland and available at time of blogging)

 
- If you have left it too late and your party is after winter time, never fear! There are plenty of online sites with downloadable decorations for a small price or sometimes even free! www.homeketeers.com have some great frozen party items to download I downloaded a free set and then I paid for some extras. Here is some bunting and a garland I downloaded and printed out (I laminated them too so they'd last longer) :


In the free kit I got: Cupcake toppers, cupcake wrappers, invitations and straw flags. In the add-on kit that I purchased were: Bag toppers, banners (above), cake toppers (large) garlands (above) mini candy bar wrappers, treat boxes and water bottle wrappers (above). this kit cost $1.99 which is about £1.30 so well worth the outlay!  They are definitely worth a look!

Party food


I also downloaded these little labels to give the food fun 'Frozen' names but I can't remember where now! They were probably in one of the kits mentioned above but I can't be sure.
We used pom bears as 'snow bears', Monster Munch as 'Yeti Feet', carrots as 'Olaf Noses', Sponge fingers as 'Anna's Frozen Fingers' and made 'Snowman Sandwiches. You can find many more fun 'Frozen' food ideas on pinterest!
The cupcake toppers above were not the ones in the kit as I had already purchased some from eBay. These ones are printed onto rice paper so they are edible!


Speaking of Pinterest, that's where I found this great idea! Get some Cheesestrings and then, using a black and orange Sharpie, draw Olaf faces at the top and buttons down the middle. The children LOVED these!

Party Games


As well as the usual Musical Statues, Pass the Parcel etc. I decided to do a few 'Frozen' themed party games too!

Pin the nose on the Olaf!

I had a large sheet of white sugar paper on which I drew an Olaf without a nose (if art is not your thing you could always print one out and have it blown up on a photocopier). I then drew one nose for each child onto orange card and wrote their names on so we could see whose nose was closest to the spot!

Frozen Fractals


As it was a warm summer's day I thought this idea I had seen at Happy hooligans would be a lot of fun! Visit their page if you want lots of details (and amazing photos) but the general gist is that you fill lots of different shaped ice cube trays and large containers with coloured water and pop them in the freezer. Once frozen turn them out and give them to the children, along with water and brushes. Each child should have one large block of ice (I used food storage containers to freeze these). They then 'paint' water onto the smaller ice shapes and press them onto their large block. As the water freezes between them it sets them in place and the children can create beautiful ice structures!

Party Favours

Personalised chocolate bars


Although I did get candy bar wrappers in the Homeketeers kit I had already ordered pre-wrapped kit-kats from a local seller on ebay. I thought this would take some of the hassle out for me as I would not need to sit and wrap them myself and also they personalised them for me. I no longer have the details of who supplied them but if you search on eBay you are bound to find loads of suppliers near you.  Here they are with a little card I popped into the party bags which was another download from Homeketeers that I laminated as a keepsake for the guests:


Loot Bags


These are always a firm favourite I got these ones on eBay - again! (Apparently I no longer go to actual shops!) I filled them with a few sweets, yo-yos, Frozen pencils and erasers, plastic bangles etc. and of course...

A slice of cake


This is my masterpiece! (clearly I'm no pro but I think I did ok for a complete novice!) I made a Victoria Sponge (I like to follow the recipe from Nigella Lawson's 'How to be a Domestic Goddess' as it's really easy and everything just goes in the food processor!) I just put jam between the two sponges. I then rolled out some ready to roll light blue icing and covered the cake in that. Then I rolled out some white ready to roll icing and cut around it in a wavy line so that when I placed it over the blue it looked like snow fall. The figures I bought on eBay (definitely a theme here!) and used a little icing to stick them down. The snowflakes around the edges came on the same sheets of rice paper as the cupcake toppers above. I bought the ready to roll icing and the light blue cake base from Hobbycraft


All in all it was a huge success and the Birthday girl and her guests had so much fun!

Birthday Girl


Just had to include this photo of my niece as she looks soooooo cute in her frozen onesie and tutu! x

If you are planning to do your own Frozen themed party I hope this has inspired you and helped you know where to go for ideas and resources! You can check out my 'Frozen Party' board on Pinterest here. Most of all...Have fun! x